#html text copy protection
Explore tagged Tumblr posts
Visit Tumblr Blog
Explore Tumblr blogs with no restrictions, modern design and the best experience.
Last Seen Tumblr Blogs


Fun Fact
Premium Tumblr themes are available from anywhere between $9 to $49.
Text
Dear Web Encryptor : Protect both Content and Source Code of HTML, HTML5, BootStrap website
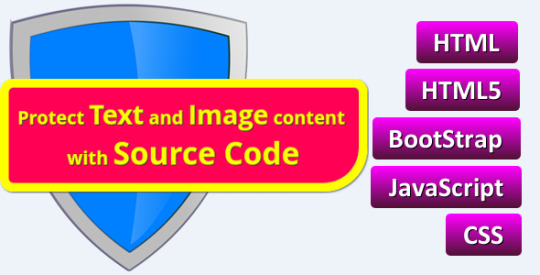
https://codecanyon.net/item/dear-web-encryptor-protect-the-source-code-of-html-html5-bootstrap-website/19555597
Every day, several website owners become victims of people who steal Text Content, Image Content and HTML, HTML5, BootStrap codes. If you do not protect your Text Content, Image Content and Source Code, you could even allow your entire site to be cloned by such people, in minutes, even without any credit or profit to you. Using this software is the only way to protect your HTML, HTML5, BootStrap websites from being stolen.
#copy protection html#dear web encryptor#disable copy and paste html#disable copy web page#disable image download html#disable right click and selection html#dreamweaver#encrypt html5#html copy protection software#html encryption software#html image copy protection#html text copy protection#html5 copy protection#html5 encryption#prevent image download
0 notes
Text
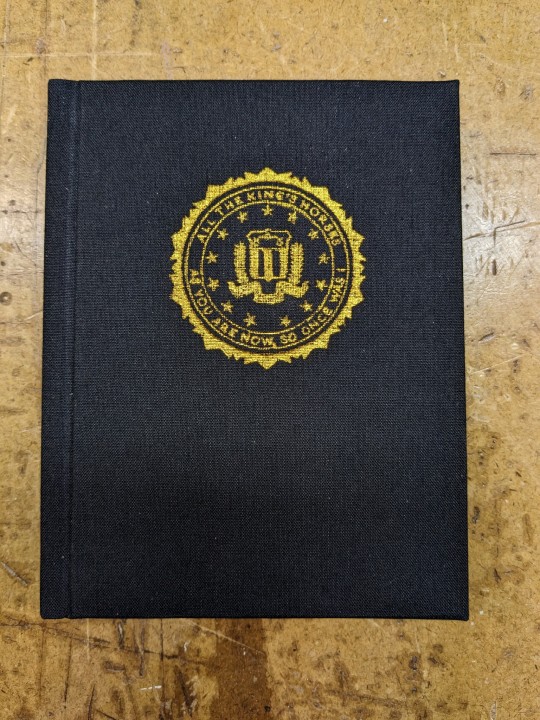

All The King's Horses | As You Are Now, So Once Was I by @samwpmarleau (grumkinsnark)
All The King's Horses [LiveJournal ch1] [Fanfiction.net ch1]
As You Are Now, So Once Was I [LiveJournal ch1] [Fanfiction.net ch1]
Fandom: Supernatural, Criminal Minds
Rating: Teen | PG-13
Category: Gen
Words: ~36,192
All The King's Horses: Protect and Serve. Fidelity, Bravery, Integrity. To what lengths would you go to uphold those oaths? When it comes to a particularly brutal and unsolvable case, the BAU just may have to resort to some more unorthodox methods. SPN/Criminal Minds crossover.
As You Are Now, So Once Was I: Sequel to "All the King's Horses." When Dean catches J.J.'s press conference on the news about a current case and notices a few...inconsistencies, he realizes the BAU is definitely going to need his help. Again. ON HIATUS


About the Book
FORMAT: Letter quarto, flatback bradel binding, french link stitch, no tapes
FONTS: EB Garamond [via Google Fonts], Supernatural Knight [via DaFont], D-Din [via Font Squirrel], Daniel [via DaFont], Permanent Marker [via Google Fonts], Arial
IMAGES: Seal of the FBI [via Wikipedia], Dean's handprint scar [by greenhorn-art]
MATERIALS: 24lb Xerox Bold Digital paper (8.5"x11"), 80pt binder's board (~2mm), 30/3 size waxed linen thread, embroidery floss (DMC #721), 1.9mm cording, brown cardstock, black Cialux bookcloth, gold foil transfer sheet (came with We R Memory Keepers hot foil pen)
PROGRAMS USED: Fic exported with FicHub, word doc compiled in LibreOffice Writer, Typeset in Affinity Publisher, imposed with Bookbinder-JS, title pages designed in Affinity Designer/Photo
.
I first read these stories on LiveJournal back in 2013, some time after I first encountered Tumblr, Supernatural, and the wider world of online fandom. Once I discovered SPNxCriminal Minds crossovers I devoured so many of them. Something about POV Outsider on the Winchesters, the existing connections with investigating monster vs human-crazy cases, and run-ins with the FBI... it's just works so well.
Of all the SPNxCM fics I read and enjoyed, All The King's Horses is among those that bookmarked themselves in my brain. Since it's been living there all these years, I thought it deserved a place on my bookshelf too.
(Rambling below)
Sourcing the Fic
I used FicHub to download the fics off of Fanfiction.net as HTML. Then I pasted them into LibreOffice Writer and created rich text documents of each fic, so I could Place them into Affinity Publisher.
The stories were crossposted, first on LiveJournal and then Fanfiction. I included the metadata from both sites in the appendices.
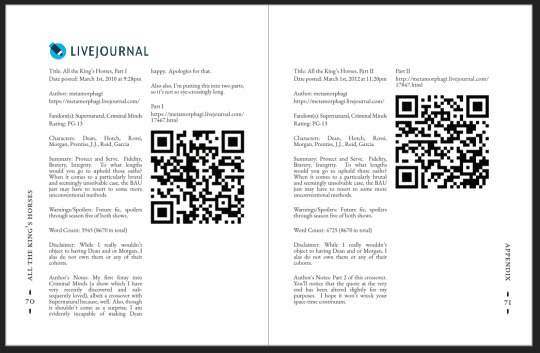
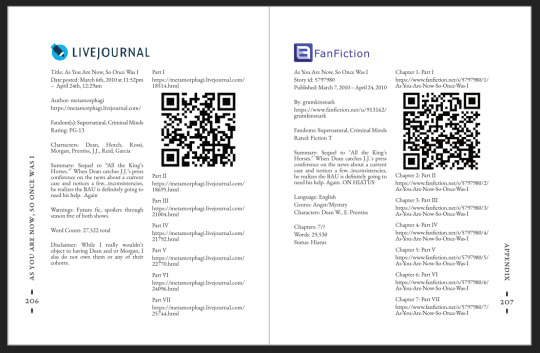
(It's fascinating to see the differences in the same work between platforms. FFN requires genres, so if the author doesn't add them on LJ then by default there's more info on FFN. But FFN limits listed characters to 2, so authors have to pick and choose the most important. Then there's the author's amusing disclaimers and spoiler warnings for these fics, which are only included in the LJ version)
Shoutout to the author for how they linked/listed their accounts on other platforms! Thanks to that I was easily able to track down all the tags/metadata for the fics, and find them here to express my appreciation for their stories!
Typesetting
Fonts
EB Garamond is my new favourite body font, 11pt as per my usual.
The title page is entirely Arial: 1) it was the closest match I have to the case file prop I was copying, and 2) if it was a government doc they wouldn't be using anything but the most basic fonts.
Headings and the the bullets bracketing the page numbers are set it Supernatural Knight, a free font in the style of Supernatural's title.
The location segments are in D-DIN, the closest free match to the font Criminal Minds uses (which is probably DIN).
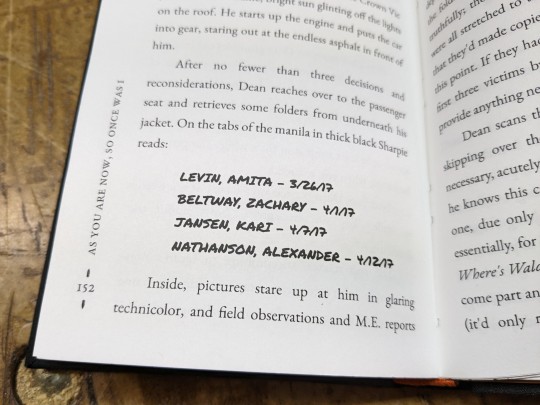
Daniel is used for Dean's 'rushed but legible' note.
Permanent Marker for the 'thick black Sharpie' case file labels.
Artwork
Title pages designed as FBI case files, copied from a prop found online (specifically Etsy's propfictionstudios', but it's all over the web so no idea who actually created it). I had fun plugging in all the fanfic/bookbinding meta!
The ID# above the author's name is the FFN story ID, and the date is the date originally posted on LJ.
The handprint used in the headings of ATKH is Dean's scar. I traced off of a screenshot from s4e01 Lazarus Rising. I chose to use the handprint instead of the anti-possession tattoo or a Devil's Trap as my SPN art element because 1) it's specific to Dean, and 2) indicates/reminds that the story is not set during the season 3 Agent Henriksen/FBI arc.
Grabbed the FBI seal off of Wikipedia.
Construction
Both fics typeset and printed separately, then sewn together into one book. Title page for the sequel was tipped in like an endpaper prior to sewing.
Endbands sewn with orange embroidery floss (DMC 721) around 1.9mm cording. I chose orange because Dean's being in jail brought to mind the orange prison jumpsuits Sam and Dean wore in s1e19 Folsom Prison Blues.

Black bookcloth for the cover, like the Winchesters' beloved black '67 Chevy Impala. (I'd wanted a Supernatural reference to balance out the Criminal Minds-ness of the FBI case files).
I'd originally planned to make lineart of the front of the car, and have it stretch across the bottom of the cover (maybe even wrap around to the back). Even found a useful reference to trace [from here], but it didn't look as good as I'd hoped. Instead I reused the FBI seal and swapped out its text with the titles.
(The effect of shiny foiled FBI symbol on small black book reminds me of one of those FBI badge wallets!)
The foiling process was an unnecessarily long and gruelling affair. My laptop served as a massive power bank for the hot foil pen as I spent 2hrs ever so slowly tracing the image, and then 15mins on the author name and touch-ups. Did it need to take so long? Moving slowly, pushing down hard, going over everything at least three times? I'm sure it didn't. BUT I did not want to chance peeling up the foil to check how I was doing and risk shifting it. It was worth it in my books (haha) ‒ I feel giddy and kick my feet like a schoolgirl whenever I see it!
New Things
Used 24lb paper for the first time, and I love it! It's a little thicker and heavier then regular 20lb printer paper, feels more substantial.
The page numbers & running/section headers are along the outer margin, instead of in the header/footer. This was my way around Affinity's buggy-ness regarding pinning things inline in master pages. (More about that below). If I had been thinking, I could have formatted them like the tabs on a file folder and cut the textblock to match. Oh well, the things you notice once it's printed 😔
This time I also started new chapters/sections using text flow & paragraph spacing settings, instead of using a master. As always, there are pros and cons.
Pro: much faster and less involved. (find chapter start, apply paragraph style VS working from the end cutting text, inserting a frame break, unlinking frames, inserting new pages with master, relinking, pasting, and adding chapter title to a different text box)
Con: images need to be added manually (whether by adding image directly, or by applying a master with the image). I forgot to do this for the second fic, so only ATKH have Dean's handprint scar.
Difficulties Encountered
Affinity Publisher is fighting me on pinning things inline on master pages. They like to disappear on regular pages I've applied the master to. Sometimes it works, sometimes it doesn't, sometimes it only works on some of the pages. Idk what's up. (The bullet character only faces one way so I had use textboxes, flip/mirror one, and pin them inline to the page number).
So instead of having page numbers in the footer, bookended left and right by text boxes with Supernatural Knight's bullet, I put it vertically down the side.
Updated Publisher and all my paragraph styles' fonts changed/went funny. Something to do with the update's variable font support, I think. What was previously 'EB Garamond' regular, was now something along the lines of 'EBGaramond-Regular' which isn't a font. Issue seems to have ironed itself out in my original (near-complete) doc while I was busy remaking it. 😐
On the bright side, the update brought QR code generation to Affinity!
#All The King's Horses#As You Are Now So Once Was I#grumkinsnark#samwpmarleau#fanfiction#bookbinding#fanbinding#supernatural#criminal minds
109 notes
·
View notes
Note
Question from someone just starting with creating and then posting art to Tumblr, do you think I should be watermarking my pieces?
I’ve always disliked watermarks as they naturally tend to dissuade people from interacting with art in a natural manner; it depends very heavily on the size and placement of the mark, obviously. BUT, often times an artist will overzealously obscure their work with identification and it has a somewhat repulsive effect on the average viewer - a wall has been erected between the viewer and the art, in a sense. Watermarks, to me, exist to prevent very specific situations from unfolding with your work - almost all of those reasons seem to be financially motivated, like preventing strangers from printing your art out at home or reposting without attribution. Situations that could affect your ability to profit off of your work.
Admittedly, much of my perception about this issue was inspired by an article included in the book “Context” by Cory Doctorow, wherein he writes about how he’s benefitted from “thinking like a dandelion”, which is an idea that was inspired by conversation the author had with Neil Gaiman — I’ll try and summarize the parts of the point that are more relevant to visual arts; since portions of the allegory refer more specifically to certain qualities of written media.
He begins with, “Mammals worry about what happens to each and every one of their offspring, but dandelions only care that every crack in every sidewalk has dandelions growing out of it. The former is a good strategy for situations in which reproduction is expensive, but the latter works best when reproduction is practically free — as on the Internet.”
So how do you “think like a dandelion” then?
“Your work needs to be easily copied, to anywhere whence it might find its way into the right hands. That means that the nimble text-file, HTML file, and PDF (the preferred triumvirate of formats) should be distributed without formality — no logins, no e-mail address collections, and with a license that allows your fans to reproduce the work on their own in order to share it with more potential fans. Remember, copying is a cost-center — insisting that all copies must be downloaded from your site and only your site is insisting that you — and only you — will bear the cost of making those copies. Sure, having a single, central repository for your works makes it easier to count copies and figure out where they’re going, but remember: dandelions don’t keep track of their seeds. Once you get past the vanity of knowing exactly how many copies have been made, and find the zen of knowing that the copying will take care of itself, you’ll attain dandelionesque contentment.”
The rest of the allegory more specifically applies to written work, but I’ll link it here for the sake of posterity. Essentially: every wall or pre-requisite that you establish before allowing a fresh set of eyes to fall upon your work actually may deter people from engaging with the work and sharing it with others. Signatures, subtle watermarks that are “baked” into the work, or maybe like.. a well-placed QR code that links people back to you — all of those would be my suggestion for someone who wants to leave a lasting, linking thread between a given work and it’s artist. If the right person sees your art and connects with it, there SHOULD be a way for them to follow that thread back to you and discover more; but if you over-prioritize demonstrating ownership over your work, you’re likely to drive those coveted genuine connections away.
On the other hand, if your primary goal is to sell prints or other products, brazenly watermarking your work will protect your bottom line from the kind of low-level art-scraping that drives all those shady redbubble shops and etsy stores that sell stolen works on cheap t-shirts and hankies. For me, art is a primarily social interest in which I prioritize the sharing of culture and ideas. I don’t want financial factors to take precedence and alter how/why I created something; it feels like I’d have to take much of myself out of my art in order to make it palatable for consumer spaces.
You should determine your priorities and then strive to make art that fulfills those priorities without compromise. I think you’ll find that self-satisfaction manifests readily at different points in the midst of that process.
#my asks#hope this helps! I’m against watermarking my own stuff bc I’m not really concerned about someone trying to steal/sell my weirdo works#in spite of that: I’ve had several people ASK to buy stuff from me on occasion; I’m always glad to facilitate that personally#but yeah as a result I’m obviously not moving boxes of prints of anything#and this is what works for me right now - my mind may change on it later if my life and priorities change#it’s an everongoing process
22 notes
·
View notes
Text
This has been a good tool so far (I participated in the Beta). Theres some key differences from Google docs that took some getting used to. And some major perks that for me, made Ellipsus a worthwhile service to try switching to.
The Major Draw for me was their anti-AI stance
This is a tool made by creators who know fanfiction writing well, and designed intentionally as an alternative to tools like Google Docs that are increasingly embracing LLM integration with their products. Ellipsus is new, but its road map is promising. They are designing their tool as a word processor that will protect works from LLM use - and the version history is a great tool to show your development process - to prove that you wrote your work from conception to final product.
Other Major Positives I've discovered through participating in the Beta
Chat and Comments - Ellipsus has two ways to talk to your collaborators and so thats really nice if youre brainstorming an idea vs seeing a beta comment on a particular sentence
The interface is really nice to look at. And it's easy to navidate between all the tools and features.
The Export options seem designed with AO3 in mind. In addition to the option to export your main document from Ellipsus to PDF, you can also copy the whole thing as either rich text or html - perfect for transfering to AO3
Focus mode is a treat
And in general I have found the developers to be extremely responsive to suggestioms. perhaps that will change with a larger userbase to manage, but it was still a real selling point to me.
Ellipsus vs. Google Docs - Differences I needed to Adjust to:
The drafts feature is how your betas can edit and comment on a document. Rather than accept and reject each change, Ellipsus currently gives you a compare versions feature - it is still easy to see what your beta changed but you need to do the work of changing it back if you don't agree.
Sharing a link gives read access only - you need to have someone's email address to add them as a collaborator (editor or co-author)
Ellipsus doesn't (yet) have the option to sort your works into different folders but theyve made so many good updates just within the beta time period that I wouldn't be surprised if it was in the cards for the future.
If I frequently switch between desktop and mobile, ocasionally I will see that the mobile version has not yet seen the desktop changes - this has only happened a couple times. Probably has to do with the draft still being open on my desktop
My largest document on Ellipsus now has 3 chapters of beta comments, several drafts, and 50,000 words. Thus far no issue with lag on desktop or mobile.
After nine months in closed beta, we’re ready to lift the waitlist and invite anyone to try Ellipsus! 🪩
Are you tired of:
... Large docs that lag?
... Bouncing between tools to collect feedback from editors and betas?
... Large corporates and looming LLMs?
Then Ellipsus might be just what you’re looking for. :)
Give us a try and let’s shape the future of collaborative creative writing, together. ✨
4K notes
·
View notes
Text
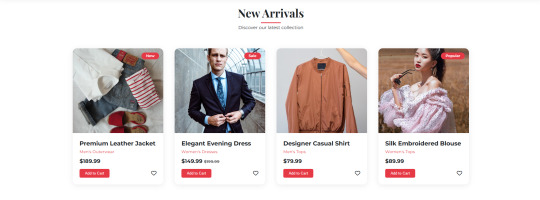
ELEGANCE - Landing Page

Live Demo | Buy Now
Key Highlights:
Dark/Light Mode Toggle: Enhance user experience with an adaptive color scheme.
Stylish Hero Section: Immediately grabs attention with bold typography and imagery.
Interactive Product Cards: Add-to-cart, wishlist, price tags, and categories.
Conversion-Driven Features: Includes newsletter form, feature highlights, and CTA buttons.
Responsive Layout: Fully optimized for all screen sizes (mobile, tablet, desktop).
WhatsApp Button: Easily reachable for customer inquiries.
Optional Protection Overlay: Disable copy/right-click in preview versions.
Built with clean HTML, CSS, and JS — no external frameworks — making it easy to customize and deploy immediately.

Features:
Responsive design for all screen sizes
Dark and light mode toggle
Animated hero and product sections
Product cards with wishlist and add-to-cart buttons
Newsletter subscription form
WhatsApp contact button
Protection overlay option for preview versions
Clean and organized HTML, CSS, and JS code
Font Awesome icons integrated
Google Fonts (Montserrat & Playfair Display)
Requirements:
Basic HTML/CSS knowledge (for customization)
Any code editor (e.g., VS Code, Sublime Text)
Modern web browser (for testing)
Internet connection (to load external assets like fonts/icons)
Instructions:
Unzip the downloaded folder.
Open index.html in your browser to preview the template.
Use any code editor to customize content, images, and branding.
Upload to your hosting or integrate into your web project.
(Optional) Modify protection overlay or WhatsApp number as needed.
Development Time:
12–14 hours (design + code + responsiveness + animations)
Message to Reviewer:
Hi, This is a responsive HTML landing page for a clothing brand. All assets are externally hosted (Unsplash, Font Awesome, Google Fonts). Let me know if anything else is required. Thanks!
Live Demo | Buy Now
#html#css#htmlcoding#html css#js#landing page#landing page builder#landing page design#landing pages#high fashion#panel#script
1 note
·
View note
Text

How to Write a GBP Business Description That Ranks and Converts
Introduction
Your Google Business Profile business description is one of the few places where you control the messaging. It’s your opportunity to tell Google—and your potential clients—exactly what your B2B company does, who you serve, and why they should trust you.
In local SEO, this short block of text helps improve:
Search relevance
Local keyword targeting
Conversion rates from your GBP listing
But most B2B businesses either skip it, stuff it with jargon, or use vague copy that fails to drive action.
In this article, we’ll break down how to craft a GBP business description that helps you rank locally and convert high-intent prospects.
What Is the GBP Business Description?
The business description is a 750-character (max) section in your GBP listing, visible under the "From the business" section. It’s different from the automated summary Google sometimes pulls in—and it’s completely under your control.
You can use this section to:
Describe your core offerings
Highlight your target customers
Mention your service areas or locations
Add strategic keywords for relevance
Reinforce trust signals (e.g., experience, certifications)
GBP Business Description Best Practices for B2B
✅ 1. Lead With What You Do and Who You Help
Avoid starting with your company history. Instead, clearly state:
Your primary service
Your target audience
Your value proposition
Example: “We provide cybersecurity and compliance consulting for mid-sized healthcare and legal organizations across the Midwest.”
This tells Google and users exactly who you are and who you serve—immediately.
✅ 2. Incorporate Geo-Modified Keywords Naturally
To improve local SEO relevance, include:
Your main service area(s) (cities, regions)
Your primary service(s) in combination with location
Example: “Our Denver-based IT team supports businesses throughout the Front Range with managed services, cloud migration, and 24/7 tech support.”
Avoid keyword stuffing. Mentioning 1–2 locations is enough.
✅ 3. Highlight What Sets You Apart
In a few words, showcase your USP (unique selling proposition). Mention:
Years of experience
Certifications or partnerships
Industry specialties
Support model or pricing differentiators
Example: “Trusted by over 150 Colorado businesses and certified Microsoft Gold Partners, we deliver tailored IT solutions that reduce downtime and boost security.”
✅ 4. End With a Local CTA or Invitation
While GBP descriptions don’t allow hyperlinks or HTML, you can still add a call-to-action that encourages users to engage.
Examples:
“Contact us today to schedule a free consultation.”
“Serving clients in Orange County, San Diego, and Riverside.”
“Let’s talk about how we can support your growing team.”
✅ 5. Keep It Professional, Skimmable, and Focused
Avoid fluff, slang, or walls of text. Aim for:
2–3 clear sentences
Simple, direct language
Line breaks if formatting allows (some mobile formats display breaks)
Sample GBP Business Description (B2B Format)
“Acme Solutions is a B2B cybersecurity firm serving financial institutions and healthcare companies across Chicago, Milwaukee, and Minneapolis. We specialize in compliance audits, managed security, and incident response. With over 15 years of experience and a 24/7 support team, we protect your data and reputation. Contact us to schedule your free consultation.”
Character count: ~450 Optimized for: Services, keywords, location, conversions
Common Mistakes to Avoid
❌ Overusing keywords (“IT support Chicago managed IT services Chicago tech support Chicago”)
❌ Too generic (“We offer great services for any business”)
❌ No location mentioned (hurts local pack relevance)
❌ Not aligned with website messaging (confuses Google and users)
❌ Listing phone numbers, URLs, or emojis (against GBP policies)
How to Edit or Add Your GBP Business Description
Log into your Google Business Profile at google.com/business
Select your business
Click “Edit Profile”
Scroll to the “About” section
Add or update the Business Description
Click Save
Edits may take a few minutes to a few days to publish. Always double-check the live listing afterward.
Conclusion
Your GBP business description is more than a formality—it’s a critical piece of local SEO real estate. For B2B companies, it’s also a chance to differentiate, clarify your niche, and invite action.
Write it with searchers and Google in mind, and you’ll improve both visibility and conversions from your Google listing.
0 notes
Text
Safeguard Your Website’s Design and Layout with Copyright

To ensure your website’s design and layout are protected by copyright, consider the following key points:
Automatic Protection: Copyright protection is automatic as soon as you create original content, design elements, or code for your website. This includes text, images, graphics, and the unique source code (HTML, CSS, etc.) that powers your site.
What’s Protected:
The content (text, images, videos, graphics, etc.) and the source code (HTML, CSS, JavaScript) are protected by copyright if they are original.
The general layout or look of a website (such as common grids or standard templates) is usually not protected, unless the selection and arrangement are highly original.
Functional aspects (like navigation or user interface concepts) are not covered by copyright but may be eligible for patent protection.
Strengthening Your Protection:
Add a Copyright Notice: Place a notice (e.g., © [Your Name/Company] [Year]) in your website’s footer. This makes your claim clear and can deter infringement.
Register Your Copyright: While protection is automatic, registering your website’s design and content with the copyright office (such as the US Copyright Office or Indian Copyright Office) provides stronger legal rights, including the ability to sue for statutory damages and attorney’s fees.
Document Your Work: Keep records such as screenshots, source code files, and descriptions of your design to prove originality and ownership if needed.
Use Terms and Conditions: Clearly state in your website’s terms that copying or reuse of your design and content is prohibited.
Technical Measures: Consider disabling right-click, using watermarks on images, and employing anti-bot technology to deter copying.
If Infringement Occurs:
Contact the infringing party to request removal.
Use DMCA takedown notices or seek legal help if necessary.
In summary, while the unique content and code of your website are protected by copyright, the general layout is only protected if it is highly original. Registering your copyright and using clear notices and technical safeguards will further strengthen your protection.
Would you like details on how to register your website’s copyright in a specific country or tips on monitoring for infringement? Blog Resource : Safeguard Your Website’s Design and Layout with Copyright
0 notes
Link
#autoSSL#Automation#cloud#configuration#containerization#DevOps#Docker#HTTPS#Let'sEncrypt#Linux#networking#NGINX#proxyserver#reverseproxy#Security#self-hosted#servermanagement#systemadministration#TLS#Traefik#webserver
0 notes
Text
🚀 Product of the Day! 🛡️ Protect your Joomla site with the Content Protection Plugin! Block text selection, disable right-click, and prevent copy-pasting—keeping your content safe.
🔗 Get it now: https://www.templatemonster.com/joomla-extensions/content-protection-joomla-plugin-450268.html #Joomla #WebSecurity
0 notes
Note
Hey friend! I learned how to make gif packs recently and really want to help the others in this community as I am a disabled human and struggle finding the content I need but I’m struggling with how to post my packs as like if i do a post I can only post so many. Could you help or put links or etc on how to make like a source link with all the gifs?
hey anon! sorry this reply is so late. below i've outlined how to create a source link for a gif pack.
where you'd like to upload your gifs is based on personal preference. i personally upload mine on a separate sideblog, pictured below
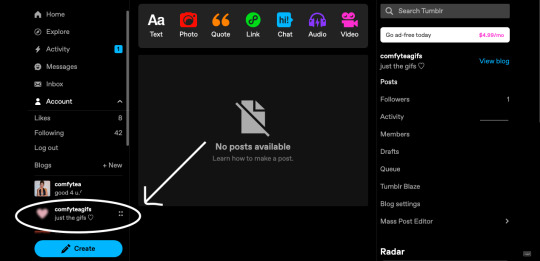
open up the blog you are using (blogurlname.tumblr.com) and click the edit appearance icon in the top right corner. looks like this on mine!

click the add page button, again pictured below. you may have to scroll a bit. my links are protected via my discord server! you may always message me or @cozysip for links to certain packs if you are uncomfortable with discord.

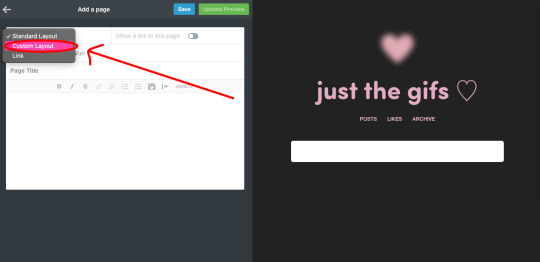
after that, your screen should look something like this!! here, you can keep it as a standard layout and start uploading your gifs from your computer and adding whatever sort of text you would like. or keep it blank and just add the name of the fc + their gifs. you can also change the layout to custom and add a page theme. i'll add how i do this below. free page themes are aplenty on tumblr, you just have to know how to search!

after clicking the dropdown menu highlighted above, you should see an option to switch it to "custom layout" as shown below. this may look a bit different if you: a) are on a browser other than chrome or b) are working on something other than a macbook. but the process to getting here should remain pretty much the same as far as i know!
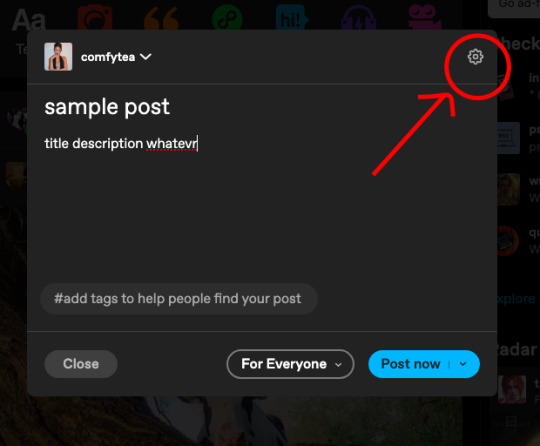
uploading gifs this way will look a bit different than a standard layout. i usually open up a draft and insert gifs that way, save the draft, and then copy + paste the url into the page theme code. note you may have to remove a possible "v" at the end of each link. tedious, i know. from here you can paste the html for your page theme and begin editing the colors, fonts, etc.

adding these as a source link will look like copy + pasting the page url for your gif pack into a source link for your gif pack post. i'll attach screenshots of how to do this below.


and voila! you should have a post with a source link now. it will not show until it's posted. a good way to double check that you have the right source link is posting + clicking the source link. i will link the creator of the page theme i use for gif packs below. if you need anymore help with this, feel free to dm me or send another ask! always happy to help.
0 notes
Text
Yeah. Like, I could get how basic html and css might be needed; you could learn that in like an afternoon. But like, when adding webmentions to my site, why couldn't I just find a php script that I could simply plug into it? Why do I need to learn an entirely new programming language like php? All the documentation is made as if people already know this stuff?
There should be public repositories of plug-and-play scripts for this stuff. Like, rss feeds, and creating posts, and sending webmentions, can all be automated with php scripts, though you would need to password protect them, which also means needing an authentication script.
It shouldn't be like that. Like I said before; we need public repositories of easy-to-use scripts that would work on ANY hosting platform. Like, themes are made for websites and shared. Why not have scripts for this indie-web stuff? Right now, you have to go through third-party services to make a lot of this stuff usable without coding it yourself, and you still need to write it all in a text editor, upload it to your site, and then copy the URL to something that will send the webmention for you. Or receiving webmentions. RSS feed generation? There are apps for that, but why use an app when a simple script could do it?
Well, be the change you want to see in the world, and all that. I am working on those scripts for webmentions(Both receiving and sending), a comment generator, rss feed aggregation, rss feed generation, a post writer, and 2 factor authentication. I will post them free to use on my site, and it should be as simple as plopping them into your sites directory, and adding in some text files for config.
Don't expect all of it any time soon, but the authenticator should be done tomorrow at least.
The IndieWeb has a user experience problem
I feel that so much of the existing infrastructure and tools of the IndieWeb have been built without the input of people dedicated to crafting an experience for a broader range of users. I won't call out specific services, products, or people, I mean no disrespect, but it's clear that so many of the tools that are available are made by developers, for developers.
If people really want the independent web to take off, to achieve anything close to mass-adoption, more consideration needs to placed into how non-developers can get started with them.
6 notes
·
View notes
Text
More on that pirated fanfic thing...
@spamatron3000 wrote: #i doubt they have any of mine #primarily because only like two of them have ever been finished
I notified a few other authors whose works were listed along with mine (there are TONS but I just ran out of time today), and some of the fics that company had pirated were not even finished on AO3, so incomplete status does not appear to be any protection from piracy.
@littlebluewraith wrote: #i'm super curious about how much--if anything--they might have changed #did they at least ctrl+f and replace names or was it left fully intact?? lmao holy shit
NOPE. Not only did they not change anything, they didn't even do the logical thing and download the auto-generated ebook format from AO3! Instead, they appear to have copied the HTML version directly and dropped it into a (bad) ebook file generator, because it's full of formatting errors like underlined text and single-line paragraph breaks that wouldn't be present in a properly-formatted epub like the ones AO3 generates. (I read downloaded fics on my Kindle, so I know what the formatting looks like.) I looked at some other pirated books in their lineup, and it's the same thing in all of them. It makes me think the fics may have been scraped by a poorly-programmed bot, rather than manually copied.
Didn't even make a fake author name, holy shit. Is the lazily pirated fanfic genre really lucrative enough to make this worth it?? Who the fuck is buying these???
As for how lucrative it is... Sadly, the answer is very, which is why it's a huge problem throughout the publishing world. One common tactic is for pirates to steal and reupload ebooks from legitimate small-press or self-published authors, and then turn around and DMCA the authors to get the legitimate copies of their books kicked off of Amazon! Since Amazon gives the benefit of the doubt to the first person to file notice, this often results in the real authors' accounts being shut down, leaving the pirated copies without any sales competition for those titles.
In the case of fanfiction, since there's no cost for the material they're selling and very little risk of legal reprisal from fanfic authors (who tend to avoid legal entanglements over IP, given the fuzzy gray area fanfiction occupies), any revenue from the pirated books is pure profit for the pirates. Hundreds of millions of people shop on Amazon, so if even 0.000001% of them buy a $2.99 ebook, they still stand to make thousands of dollars from the scheme. It's a numbers game.
As for who is buying them... The pirate company is grouping them into series and dumping them into the same keyword pool as a bunch of other genre ebooks, so given the way Amazon's algorithms work, the pirated titles have a high chance of showing up in recommendations for people reading (for example) genre supernatural romance, or mecha war stories, or whatever. Thanks to One-Click purchasing and Kindle reward promotions, the buyer may not even realize it's fanfiction until after they've bought it!
And the sad truth is, a lot of people don't care if it's pirated, as long as it's cheap and/or convenient. Look how many people shop on sites like Redbubble without verifying that the seller is the original artist, even though a massive percentage of the content there is stolen.
23 notes
·
View notes
Text
how to pack your blog into a suitcase
As of late, staff seems to have become more active in bringing down the ban hammer on feminist blogs. Because of this, it can be a good idea to have a way to preserve your content and make re-making easier. This is the “suitcase” method I’ve come up with. Important: this is a preemptive strategy, so it needs to be done prior to termination, not after.
Step one: Create a new tumblr account
By this I mean log out, and “sign up” with a new email. For the settings on this new main blog, set it to be hidden from search results (which is the most private setting available for a main blog, as you can’t make a main blog private)
Step two: Add a private secondary blog to your new account
Secondary blogs are the only blogs that can be made private, so add one to your new account. Make it hidden from search results like the main blog, and select “password protect this blog” under settings on desktop to make it private. This will be your suitcase blog where you collect all your most important content from your feminist blog.
Step three: Find and collect your best original posts
Go to https://jetblackcode.com/TumblrOriginalPostFinder and enter you blog name to find all your original posts. To make the job faster and less cluttered, I also filter it by a certain note threshold (say, 15) and only collect the ones that were bangers. Personally, since I’ve had my blog for 5 years and my posting style and ideas have changed a lot over time, I like to reblog the posts to my suitcase chronologically by starting at the bottom of the original post list on jetblackcode and adding a “(insert year) START” tag to the first post I collect from each new year.
Step four: Find and collect your favorite posts / reference posts
To make this easier on myself, I’ve taken to tagging posts “fav” and “ref” right away when I reblog them if I think I’ll want to collect them in my suitcase blog later. That way, when it’s time to update my suitcase blog, I can just go through my feminist blog and collect all posts under those tags.
Step five: Save your blog theme
To do this, open the HTML editor of your feminist blog and copy+paste everything there into a plain text document (like notepad on windows) and save it to your computer. If you have extra added pages on your blog, copy their content too.
Step six: Update your suitcase occasionally
Every so often, repeat steps 3 and 4 to collect any new posts you want to save. I do this every couple of months.
____________________
These steps will give you a hidden suitcase full of your best and favorite posts. My suitcase contains 150 posts total, condensed from my 5 years of blogging. Hopefully, you’ll never have to make use of your suitcase. But if you do, it’s easy (although repetitive) to fill your remade blog with your old content. Simply un-private your suitcase, scroll to the bottom (if you’ve organized chronologically) and start reblogging everything to your new blog.
IMPORTANT: Always keep your suitcase account separate and private so that it is invisible & standalone, don’t use the account for any other blogs. This way, it is not at risk of termination and is a permanent database.
186 notes
·
View notes
Text
Do you like rereading your favorite fics? Rewatching AMVs on loop? Are there pieces of fanart you never cease to admire?
If a specific fanwork is a source of joy in your life—a comfort read on rainy days, an art piece that inspires you to improve your craft, a cursed YTP that you inflict on every new friend who watches your favorite show—remember that it might be gone tomorrow.
Links can break when people change their screen names or platforms change their inner workings. Fanworks disappear when people delete their accounts, take down their posts, have their posts deleted without warning, or get suspended. Platforms disappear when they can't sustain a profit or when people fail to maintain them. Sometimes you'll get a heads up before your favorite fanwork vanishes; often you won't.
So you might want to smash that motherfucking download button.
Any image in your browser can be downloaded to your computer. That includes fanart! Just right-click it, then click "Save Image As…", then press enter or click "Save". On Tumblr, you can download videos the same way ("Save Video As…", then enter or "Save").
Ctrl + S (or right-clicking anywhere, then clicking "Save Page As…") lets you download an entire webpage. This copies all the current text, images, formatting, etc. into an HTML file, which you can then open in your browser even if you don't have an internet connection, and even if the page is later changed or deleted.
Note that this only works with relatively simple pages, like blog posts. You can't use it to download YouTube videos—for that, you'll need youtube-dl or one of the many "youtube to mp4" sites out there.
If you manage to navigate to a URL ending in .mp3, you can use Ctrl + S to download the audio file.
AO3 has a literal download button which lets you save fics as PDFs, HTML files, or the e-reader file format of your choice. There's no limit to the number of fics you can download.

Obviously, if a creator has deliberately taken down their work, you shouldn't re-upload it to a public space. But there's nothing wrong with keeping a private copy for yourself. And downloading fanworks is actively good as a protective measure against corporate censorship and digital decay.
#the wayback machine is also fantastic but this post is long enough#uh not really sure what to tag this#fandom#fandom meta#ao3#mine
18 notes
·
View notes
Note
elek :O smal question if i’m allowed, could you possibly teach me how to make specific colored text like in your navi? i hope you know what i mean, i’m not exactly sure how to phrase it 😭
sure !! it confused me for awhile too, but i figured out that i had to edit the HTML (from the old post editor on desktop) for it. it makes the whole experience quite inconvenient. i recommend that, once you are finished with editing the colours, you should copy the HTML and save it somewhere in case you accidentally click the wrong thing and lose it. i'll break it down a bit more because i had to figure this out completely on my own, idk why nobody talks about it huahah it's very confusing at first. [feel free to reblog this, but it might not stay true since tumblr is always being updated. it would be neat if they made this easier haha ^^]
1. i made the text without any formatting, just what i wanted it to say. i'll be able to add links or bold or italics later.

2. i switch modes so that i can add the colour. i go in and find the text i want to change and next to it put in <span style="color:#HEX">[text]</span>. the words i want to change, i'll move into "[text]".


3. now i can change the colour and put the correct text in the space. i'll find my colour code -- in this case, it'll be a gold tint.


4. i'll save draft, and here's the tricky part — now, i have to open the draft on my phone. you'll have to save draft from there so that when you open your post, you will be able to be in the beta editor on your desktop. after using the old post editor, i can't edit it in the new one. you need the new one for the colour to stay. if you open the draft in the old editor, you'll lose your progress with the HTML.
i'll open the draft on mobile and then just save it and set my phone aside again. i don't need it.
5. now, to protect yourself from accidentally opening it in the wrong editor, you have to go to any other draft and switch modes so that when you open your post, it will automatically be the right mode. you cannot switch from within that draft because you'll lose progress.


(^ this must be switched on by the time you're editing the post !! do it from another draft, and it will automatically use that mode in the first one.)
6. now, i can open the draft and it will be in the new post editor, and my text will still be coloured. i can make parts of it bold or change the text size or add links or whatever it was i wanted to add on top, and it's good. these edits can be made from the HTML to save time (?) but i find that it's much more confusing that way.
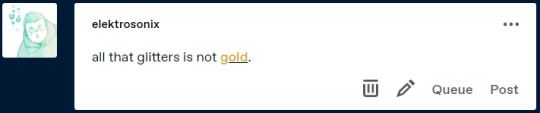
keep in mind that there are many ways to achieve this, and i only figured out how to get this to work through excessive experimentation. i am not a tumblr whiz amwlhawjk
(the post, for you to enjoy)
80 notes
·
View notes
Note
Hi! Did you deliberately block right-clicking on your blog? I have been browsing because all your pages are incredibly interesting but it is kind of difficult because I can't open things into new tabs. I also want to look up some of the books you mention but I can't copy-paste the title into the search bar.
Yes, I deliberately disabled right clicking to make it difficult for people to steal my text or images. There were people who weren't respecting my wishes, so the code got added to the site's HTML. I'm sorry that it's making things a bit difficult for you, but I'm just trying to protect the thousands of hours of work that I've put into this site. If you ever have any questions about something that the block is preventing you from accessing then feel free to send me a message at any time and I can help you work around it ^^
11 notes
·
View notes